


Contents#
In the previous NX article, we learned how to deploy and run microservices locally with Docker and Kubernetes. In this article, we will learn how to construct simple integration tests for microservices that was built with apollo-server-express and MongoDB Mongoose within NX monorepo build system.
Install NX and initialize a new project#
Create a Node workspace:
npx create-nx-workspace --preset=express
Choose Workspace name and Application name
➜  npx create-nx-workspace --preset=express
Need to install the following packages:
  create-nx-workspace
Ok to proceed? (y) y
✔ Workspace name (e.g., org name)     · nx-testing-apollo-mongoose
✔ Application name                    · svc-products
✔ Set up distributed caching using Nx Cloud (It's free and doesn't require registration.) · No


 >  NX   Nx is creating your v14.4.3 workspace.

   To make sure the command works reliably in all environments, and that the preset is applied correctly,
   Nx will run "npm install" several times. Please wait.

✔ Installing dependencies with npm
✔ Nx has successfully created the workspace.
Install the following dependencies:
- apollo-server-express
- graphql
- mongoose
- graphql-compose
- graphql-compose-mongoose
- mongodb-memory-server
- chalk
yarn add apollo-server-express graphql mongoose graphql-compose graphql-compose-mongoose mongodb-memory-server-core chalk
Create an Apollo Server Express app#
In the previous section we generated a new app called "svc-products". Now, let's modify it.
Define Mongoose schema and model#
First we will define the structure of the app by designing a GraphQL schema.
Create a new file in with the following content:
// apps/svc-products/src/app/schema.ts

import mongoose from 'mongoose'
import { composeMongoose } from 'graphql-compose-mongoose'
import { schemaComposer } from 'graphql-compose'

export interface IProduct {
  title: string
  price: number
  description: string
  category: string
  image: string
}

export interface IProductDocument extends IProduct, mongoose.Document {}

export const ProductSchema = new mongoose.Schema({
  title: {
    type: String,
    required: true,
  },
  price: {
    type: Number,
    required: true,
  },
  description: {
    type: String,
    required: true,
  },
  category: {
    type: String,
    required: true,
  },
  image: {
    type: String,
    required: true,
  },
})

export const Product = mongoose.model<IProductDocument>(
  'Product',
  ProductSchema
)

const customizationOptions = {}

export const ProductTC = composeMongoose(Product, customizationOptions)

schemaComposer.Query.addFields({
  productOne: ProductTC.mongooseResolvers.findOne(),
  productMany: ProductTC.mongooseResolvers.findMany(),
  productCount: ProductTC.mongooseResolvers.count(),
})

schemaComposer.Mutation.addFields({
  productCreateOne: ProductTC.mongooseResolvers.createOne(),
  productUpdateOne: ProductTC.mongooseResolvers.updateOne(),
  productUpdateMany: ProductTC.mongooseResolvers.updateMany(),
  productRemoveOne: ProductTC.mongooseResolvers.removeOne(),
})

export const schema = schemaComposer.buildSchema()
This code snippet defines a simple, valid Mongoose schema and model.
- The
composeMongoosefunction converts the Mongoose model to a GraphQL schema. - The
schemaComposerfunction adds the needed CRUD operations to the GraphQL schema. - Finally, the
schemaComposer.buildSchema()function builds the final GraphQL schema for our use.
Create MongoDB database instance#
There is already an article in my blog on how to free mongodb atlas cloud database. After you have created a database instance, get the connection string and pass it to your dotenv file.
Add to your .env file in the root of your nx monorepo:
MONGODB_URI=mongodb+srv://your_username:somepassword@cluster0.jdx0tj3.mongodb.net/?retryWrites=true&w=majority
MONGODB_NAME=shop
Create Apollo Server#
We are going to create an Apollo Server instance and connect to our MongoDB database with help of the mongoose library.
// apps/svc-products/src/main.ts
import { ApolloError, ApolloServer } from 'apollo-server-express'
import { ApolloServerPluginDrainHttpServer } from 'apollo-server-core'
import * as express from 'express'
import * as http from 'http'
import { blueBright, green, magentaBright, redBright } from 'chalk'
import { schema } from './app/schema'
import mongoose from 'mongoose'

const mongodbURI = process.env.MONGODB_URI
const dbName = process.env.MONGODB_NAME

export const connectDB = async (mongodbURI: string, dbName: string) => {
  if (!mongodbURI || !dbName) {
    return Promise.reject('MongoDB URI or DB Name is not defined')
  }
  try {
    await mongoose.connect(
      mongodbURI,
      { autoIndex: false, dbName },
      (error) => {
        if (error) {
          console.log(redBright(error))
        }
      }
    )
    console.log(blueBright('🐣 mongodb database started'))
    console.log(green(`🙉 dbURL `, mongodbURI))
    console.log(green(`🙉 dbName `, dbName))
    return mongoose.connection
  } catch (error) {
    console.log(error)
    return undefined
  }
}

async function startApolloServer() {
  try {
    await connectDB(mongodbURI, dbName)

    const app = express()
    const httpServer = http.createServer(app)
    const server = new ApolloServer({
      schema: schema,
      csrfPrevention: true,
      cache: 'bounded',
      plugins: [ApolloServerPluginDrainHttpServer({ httpServer })],
    })

    await server.start()

    server.applyMiddleware({ app })

    await new Promise<void>((resolve) =>
      httpServer.listen({ port: 4000 }, resolve)
    )

    console.log(
      magentaBright`🚀 Server ready at http://localhost:4000${server.graphqlPath}`
    )
  } catch (err) {
    throw new ApolloError('Something went wrong in Apollo')
  }
}

const server = startApolloServer()

export default server
The above code snippet accomplish the following:
- Creates a
connectDBfunction that connects to the MongoDB database. - Creates a
startApolloServerfunction that connects to the MongoDB database and creates an Apollo Server instance.
Now we are ready to move forward. Let's start the server.
Running the Apollo server#
Execute the following command to start the server:
nx run svc-products:serve
Output:
> nx run svc-products:serve

chunk (runtime: main) main.js (main) 3.96 KiB [entry] [rendered]
webpack compiled successfully (e34854b72ff99845)
Debugger listening on ws://localhost:9229/a8e0aa33-08e4-4f13-87c3-5300c370626d
Debugger listening on ws://localhost:9229/a8e0aa33-08e4-4f13-87c3-5300c370626d
For help, see: https://nodejs.org/en/docs/inspector
🐣 mongodb database started
🙉 dbURL  mongodb+srv://your_username:somepassword@cluster0.jxhz0o4.mongodb.net/?retryWrites=true&w=majority
🙉 dbName  shop
🚀 Server ready at http://localhost:4000/graphql
Open the browser and navigate to http://localhost:4000/graphql.
You should see the Apollo studio app, which allows us to run queries and mutations.
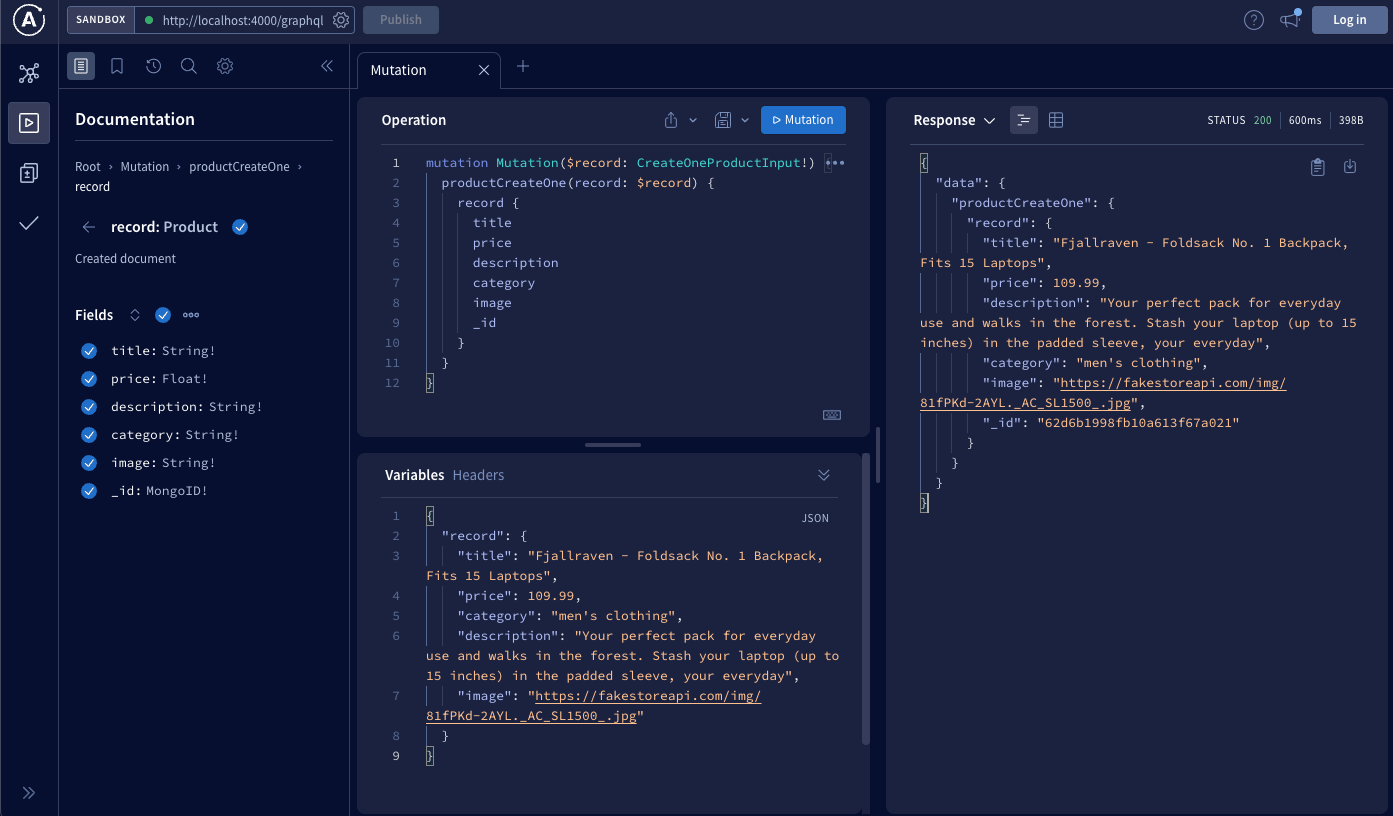
Create a new product in the database with Apollo Studio#
Let's create our first product. We will use the productCreateOne mutation.
- While on the Apollo Studio app, click on mutations button.
- Click on productCreateOne button.
- Click on record button under Arguments section.
- Select all fields under Input Fields section.
- In the Variables area of the app, fill the record object properties with the values you want to create.
Example product object:{ "record": { "title": "Fjallraven - Foldsack No. 1 Backpack, Fits 15 Laptops", "price": 109.99, "category": "men's clothing", "description": "Your perfect pack for everyday use and walks in the forest. Stash your laptop (up to 15 inches) in the padded sleeve, your everyday", "image": "https://fakestoreapi.com/img/81fPKd-2AYL._AC_SL1500_.jpg" } } - On the sidebar click on the back button.
- Select the record field under Fields section
- Select all fields under Fields section.
- Click on the blue Mutation button.
You should see the succeeded operation in the Response area.
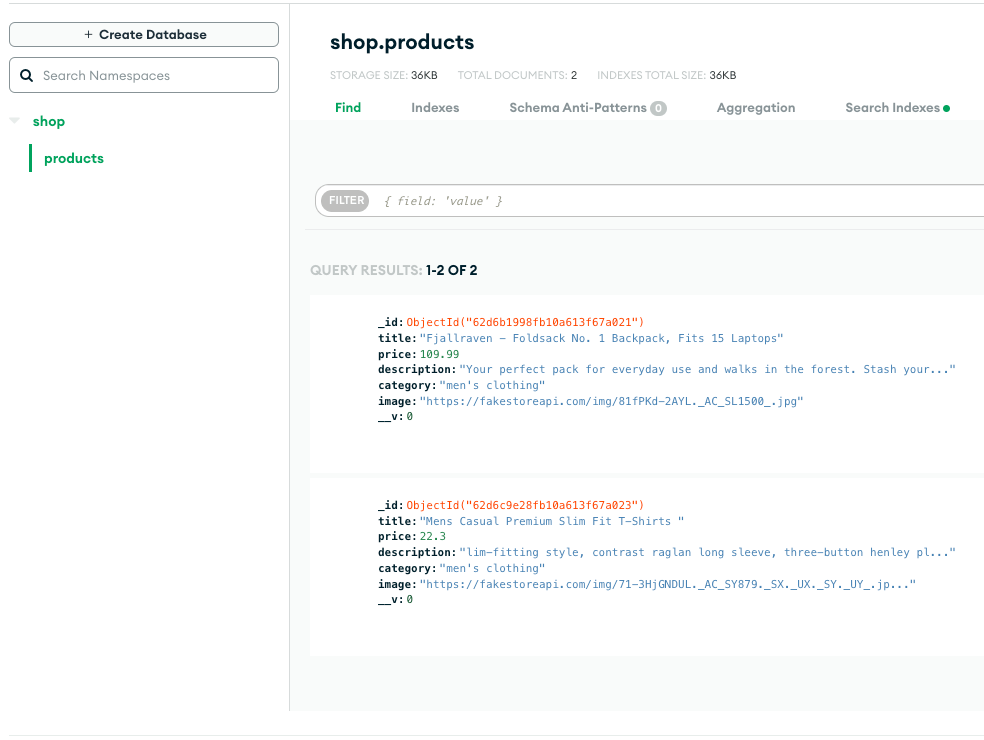
You can create few more products now.
Here is how it looks on MongoDB Atlas:
Query the products#
Now we have few products in our data set. Let's query them.
- While on the Apollo Studio app, go back to the root of the Documentation tab.
- Click on Query field
- Click on productMany button and choose all fields under Fields section.
- Click on the blue Query button.
Basically the Query should look like this:
query Query {
  productMany {
    title
    price
    description
    category
    image
    _id
  }
}
And here is the Response:
{
  "data": {
    "productMany": [
      {
        "title": "Fjallraven - Foldsack No. 1 Backpack, Fits 15 Laptops",
        "price": 109.99,
        "description": "Your perfect pack for everyday use and walks in the forest. Stash your laptop (up to 15 inches) in the padded sleeve, your everyday",
        "category": "men's clothing",
        "image": "https://fakestoreapi.com/img/81fPKd-2AYL._AC_SL1500_.jpg",
        "_id": "62d6b1998fb10a613f67a021"
      },
      {
        "title": "Mens Casual Premium Slim Fit T-Shirts ",
        "price": 22.3,
        "description": "lim-fitting style, contrast raglan long sleeve, three-button henley placket",
        "category": "men's clothing",
        "image": "https://fakestoreapi.com/img/71-3HjGNDUL._AC_SY879._SX._UX._SY._UY_.jpg",
        "_id": "62d6c9e28fb10a613f67a023"
      }
    ]
  }
}
Integration testing Apollo Server and Mongoose with Jest and mongodb memory server#
Create a new file main.spec.ts and add the following code:
// apps/svc-products/src/main.spec.ts
import { MongoMemoryServer } from 'mongodb-memory-server-core'
import * as mongoose from 'mongoose'
import { ApolloServer } from 'apollo-server-express'
import { connectDB } from './main'
import type { IProduct } from './app/schema'
import { ProductModel, schema } from './app/schema'
import { ApolloServerPluginDrainHttpServer } from 'apollo-server-core'
import * as express from 'express'
import * as http from 'http'

jest.setTimeout(20000)
jest.retryTimes(3)

let mongod: MongoMemoryServer
let server: ApolloServer

const mockDBName = 'shop'

beforeAll(async () => {
  let mongoUri = ''
  mongod = await MongoMemoryServer.create()
  mongoUri = mongod.getUri()
  await connectDB(mongoUri, mockDBName)

  const app = express()
  const httpServer = http.createServer(app)

  server = new ApolloServer({
    schema,
    plugins: [ApolloServerPluginDrainHttpServer({ httpServer })],
  })
})

async function closeMongoConnection(
  mongod: MongoMemoryServer,
  mongooseConnection: mongoose.Connection
) {
  return new Promise<void>((resolve) => {
    setTimeout(() => {
      resolve()
    }, 2000)
    try {
      mongod?.stop().then(() => {
        mongooseConnection.close().then(() => {
          resolve()
        })
      })
    } catch (err) {
      console.error(err)
    }
  })
}

afterAll(async () => {
  await closeMongoConnection(mongod, mongoose.connection)
  await server.stop()
})

describe('Integration test with apollo server and MongoMemoryServer', () => {
  const mockProduct: IProduct & { _id: string } = {
    title: 'Fjallraven - Foldsack No. 1 Backpack, Fits 15 Laptops',
    price: 109.99,
    description:
      'Your perfect pack for everyday use and walks in the forest. Stash your laptop (up to 15 inches) in the padded sleeve, your everyday',
    category: "men's clothing",
    image: 'https://fakestoreapi.com/img/81fPKd-2AYL._AC_SL1500_.jpg',
    _id: '62d6b1998fb10a613f67a021',
  }

  const publishedProduct = new ProductModel(mockProduct)

  it('should return valid result', async () => {
    await publishedProduct.save()
    const result = await server.executeOperation({
      query: `
            query Query {
              productMany {
                title
                price
                description
                category
                image
                _id
              }
            }
            `,
    })

    expect(result.data.productMany).toHaveLength(1)
    expect(result.data.productMany[0]).toMatchObject(mockProduct)
  })
})
The code above allows us to test the Apollo Server service with Mongoose and MongoDB Memory Server. MongoDB In-Memory Server is a tool that allows us to create a local MongoDB instance from within nodejs, for testing or mocking purposes.
The following steps are taken:
- In beforeAll() function we are getting the MongoDB Memory Server URI and connecting to Mongoose. Then Apollo server is created. beforeAll() function is executed before any of the tests in this file run.
- In afterAll() function we are closing the connection to Mongoose, MongoDB Memory Server and Apollo Server. afterAll() function is called after all tests in the file have completed.
- describe() function is the test suite.
- it() function is the actual test. The code is straightforward, simple and understandable. The api call is executed with the help of Apollo's executeOperation() function.
Check the repository:
https://github.com/creotip/nx-testing-apollo-mongoose
Conclusion#
In the development process, integration testing is crucial. On the surface, tests appear to take an excessive amount of time. However, tests are a critical factor in the development process, and they will save you a lot of time in the future.